Skip to main content area
Home
  • English
  • Español
  • Get it
  • Build it
  • Use it
  • Blog
  • DiyouPCB
    • Get It
    • Build
    • Use
    • Improve
    • Gallery
    • Downloads
  • Contact
  • About us

Problemas con el laser rojo y Eagle User Language Program

Submitted by DIYouware on Fri, 10/10/2014 - 22:11

Seguimos probando el sistema de enfoque con el láser rojo.

Fue fácil encender el láser rojo pero desafortunadamente el diodo rojo necesita menos corriente que el azul y cuando lo encendimos se auto-destruyó. Sucedió tres veces hasta que deducimos el problema, así que hemos destruido tres Pickups durante esta prueba. Ahora que tenemos el problema controlado estamos limitando la corriente del diodo láser y...

  • Read more about Problemas con el laser rojo y Eagle User Language Program
  • Log in or register to post comments

Red laser issues and Eagle User Language Program

Submitted by DIYouware on Fri, 10/10/2014 - 21:53

We are still testing the focus system with the red laser.

It was easy to turn the laser on but unfortunally the red diode needs less current than the blue and when we turn it on it auto-destroyed. It happend three times till we deducted the problem, so we killed three pickups during this testing. Now that we know the problem we are limiting the current of the red laser diode and.....

  • Read more about Red laser issues and Eagle User Language Program
  • Log in or register to post comments

El láser rojo y la máscara de soldar

Submitted by DIYouware on Mon, 09/22/2014 - 19:49

La semana pasada hicimos más pruebas para enfocar el láser.

La idea original consistía en enfocar el láser en cuatro puntos de enfoque que tienen un material reflectante y que van pegados bajo el cristal. El robot mueve automáticamente el láser a esos puntos de enfoque y toma cuatro medidas de enfoque. Entonces utiliza las medidas para extrapolar los datos al resto de la PCB, y así enfocar con precisión el láser mientras imprime el circuito. Parecía viable pero tuvimos algunos problemas con el espesor del vidrio. Estábamos usando un vidrio de 2mm y tuvimos que cambiar a vidrio de 1,5mm que funciona mejor. Pero incluso con el nuevo vidrio no estábamos satisfechos porque los puntos de enfoque estaban demasiado lejos de las esquinas de la PCB y las medidas de enfoque no eran muy precisas.

Si queríamos mejorar la precisión de enfoque tendríamos que enfocar en las esquinas de la PCB. Esto no es un problema porque la PCB es bastante reflectante como para enfocar directamente en ella, pero como siempre ocurre en estos casos aparecieron efectos secundarios. Primero al enfocar en las esquinas dejamos cuatro manchas en el dry-film porque el láser UV lo sensibiliza en esos lugares. Segundo tenemos que enfocar a través del cristal y del solar-film. Recordad que utilizábamos el solar-film para filtrar los rayos UV y proteger la PCB contra el efecto "halo" producido por la lente del pickup. El filtro funciona muy bien mientras imprimimos pero disminuye el rendimiento del láser cuando enfocamos. Así que estábamos de nuevo en un callejón sin salida.

Pero hemos encontrado una solución: utilizar el láser rojo.

El PHR-803T es fantástico. Tiene tres diodos láser: uno en la banda infrarroja para la lectura de CDs, otro en la banda roja para DVDs y otro en la banda de UV cercana para HD-DVD/Blu-ray, que es el que usamos para imprimir. Cuando hackeamos el pickup no prestamos mucha atención a los láser rojos porque estábamos centrados en sensibilizar el dry-film con luz UV, pero creo que ahora vamos a usar el rojo para enfocar.
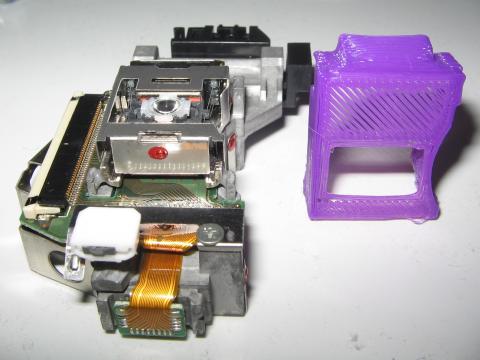
 

Usar el láser rojo para enfocar tiene algunas ventajas:

  • Read more about El láser rojo y la máscara de soldar
  • Log in or register to post comments

The red laser and the welding mask

Submitted by DIYouware on Mon, 09/22/2014 - 19:19

Last week we were doing more testing on laser focusing.

The first idea was to focus the laser on four reflecting focus points we glued under the glass. The robot automatically moves the toolhead to those focus points and take four focus measures. Then it uses them to extrapolate the data to the rest of the PCB so it can accurately focus the laser while rastering the PCB picture. But we had some problems with the glass thickness. We were using an inadequate 2mm glass and we had to change to 1.5mm glass which works better. But even with the new glass we were not satisfied because the focus points were too far from the PCB corners so the measures were not accurate.

If we wanted to improve the focus accuracy we had to focus on the PCB corners. This is not a problem because the PCB is reflective enough to focus directly on it but as always happens appeared two secondary effects.

First we “paint” four blots on the PCB dry-film because the UV laser sensitizes it on the places it focuses. Second we have to focus through the glass and the solar film. Remember that we use the solar film to filter the UV rays and protect the PCB from the “halo” effect produced by the pickup lens. The filter is good while we printing but diminish performance when we focus. So we were again in a dead-end alley.

I think we found a solution: the red laser.

The PHR-803T is fantastic. It has three laser diodes: one in the infrared band for reading CDs, one on the red band for DVDs and one on the near UV band for HD-DVD/Blu-ray. When we hacked the pickup we didn’t paid too much effort on the red lasers because we were focus on sensitize the dry-film with UV light but I think we are going to use the red one now.

Use the red laser to focus has some advantages:

  • Read more about The red laser and the welding mask
  • Log in or register to post comments

Focalizados en enfocar

Submitted by DIYouware on Fri, 09/12/2014 - 18:23

Hemos terminado las pruebas de impresión 3D con éxito así que ahora vamos a continuar con las pruebas del cabezal laser, pero antes permitidme explicar porqué es tan importante tener una plataforma perfectamente nivelada.

Como dije en mi anterior artículo estuvimos desarrollando código para probar el algoritmo de auto-nivelado de la plataforma. Este algoritmo se encuentra en el firmware del robot y se encarga de mantener la plataforma perfectamente nivelada mientras el robot se mueve.

El test que hemos desarrollado está basado en enfocar el laser sobre la plataforma midiendo la distancia a la plataforma en 36 puntos distribuidos en una matriz de 6 por 6.

Para comprobar si el algoritmo de auto-nivelado funciona bien hicimos las pruebas antes y después de calibrar el robot.

Los resultados fueron los siguientes:

Fig. 1 – Resultados de las pruebas antes del auto-nivelado.

Fig. 2 – Resultados después del nivelado.

  • Read more about Focalizados en enfocar
  • Log in or register to post comments

Focus on focusing

Submitted by DIYouware on Fri, 09/12/2014 - 16:27

We successfully finished the 3D printing tests and now we are focus on the Laser Toolhead, but first let me tell you how important is to level correctly the fixture plate.

As I said in the last post we developed some code to test the bed auto-levelling algorithm. This algorithm is in the firmwware and maintains the platform perfectly levelled while the robot is working.

The test is based on focusing the laser on the platform. We use the laser to measure how far is the platform in 36 surface points distributed on a 6x6 matrix.

To check if the bed auto-levelling algorithm works fine we did the test after and before leveling the platform.

These are the results:

Fig. 1 – Test results without bed auto-levelling

Fig. 2 – Test results after auto-levelling calibration

  • Read more about Focus on focusing
  • Log in or register to post comments

El test de la rana

Submitted by DIYouware on Sat, 09/06/2014 - 23:43


Simplemente enseñaros el primer objeto 3D impreso con el robot. Nos llevo aprox. una hora y la calidad es realmente buena.


  • Read more about El test de la rana
  • Log in or register to post comments

The frog test

Submitted by DIYouware on Sat, 09/06/2014 - 23:42

Just show you our first 3D object printed with the robot. It took aprox. one hour and the quality is really good.


  • Read more about The frog test
  • Log in or register to post comments

Vacaciones e impresión 3D

Submitted by DIYouware on Fri, 09/05/2014 - 20:10

Después de tomar algunos días de vacaciones hemos continuado las pruebas del robot.

En los últimos días hemos estado trabajando en el cabezal 3D. Hicimos algunas pruebas con muy buenos resultados y de paso hemos probado los límites de velocidad de la máquina que están en aprox. 3500 mm/min (al imprimir en 3D).

Por otro lado hemos mejorado el software del servidor añadiéndole funcionalidad para controlar el extrusor y la temperatura del hot-end.

También hemos desarrollado un algoritmo para comprobar la eficiencia del mecanismo de auto-nivelado de la plataforma. Teníamos algunas dudas sobre su efectividad, pero después de algunas pruebas hemos visto que eran infundadas, y la plataforma siempre está autonivelada con una precisión de menos de 0.01mm.

  • Read more about Vacaciones e impresión 3D
  • Log in or register to post comments

Vacation time and 3D printing

Submitted by DIYouware on Fri, 09/05/2014 - 20:00

After some days of vacation we have continued the robot testing.

Last days we have been working on the 3D Printing Toolhead. We did several printing tests with good results and we found the speed limits of the machine which are aprox. 3500 mm/min (when 3D printing)

Also we improved the server side software. We added functionality to control the 3D printing extruder and the hot-end temperature.


We also developed a firmware algorithm to test how efficient is the auto-levelling algorithm. We had some doubts about if really the algorithm worked fine but they were unfounded because it does and the platform is always levelled with a precision of less than 0.01 mm.

  • Read more about Vacation time and 3D printing
  • Log in or register to post comments

Pages

  • « first
  • ‹ previous
  • …
  • 9
  • 10
  • 11
  • 12
  • 13
  • 14
  • 15
  • 16
  • 17
  • …
  • next ›
  • last »

(c) 2013 Diyouware.com