Skip to main content area
Home
  • English
  • Español
  • Get it
  • Build it
  • Use it
  • Blog
  • DiyouPCB
    • Get It
    • Build
    • Use
    • Improve
    • Gallery
    • Downloads
  • Contact
  • About us

3D printing

In this chapter we will cover the process of 3D printing using the 3D Printing ToolHead.

The process consists on the following steps:

English
  • Read more about 3D printing

Dispensando pasta de soldar

En este capítulo veremos el proceso de dispensar pasta de soldar en pads SMD usando el Cabezal Dispensador de Pasta.

El proceso consiste en los siguientes pasos:

Spanish
  • Read more about Dispensando pasta de soldar

Dispensing solder paste

In this chapter we will cover the process of dispensing solder paste on SMD pads using the Paste Dispenser ToolHead.

The process consists on the following steps:

English
  • Read more about Dispensing solder paste

Taladrando vías y agujeros

En este capítulo veremos el proceso de taladrado de vías y agujeros usando el Cabezal de Taladrado y una Dremel 200.

El proceso consiste en los siguientes pasos:

Spanish
  • Read more about Taladrando vías y agujeros

Fotograbando PCBs con el cabezal láser

En este capítulo veremos cómo fotograbar PCBs utilizando el cabezal láser.

El proceso consiste en los siguientes pasos:

Spanish
  • Read more about Fotograbando PCBs con el cabezal láser

Drilling vias and holes

In this chapter we will cover the process of drilling vias and holes using the Drilling ToolHead and a Dremel 200 rotary tool.

The process consists on the following steps:

English
  • Read more about Drilling vias and holes

Photoengraving PCBs using the Laser Toolhead

In this chapter we will cover how to photoengrave PCBs using the Laser Toolhead.

The process consists in several steps:

English
  • Read more about Photoengraving PCBs using the Laser Toolhead

Tutorial, nueva versión del software e investigaciones

Submitted by DIYouware on Tue, 06/09/2015 - 22:45

Seguimos con el arduo trabajo de escribir el tutorial... :-)

¡ Sí! está casi terminado. Sólo tenemos que escribir algunos capítulos más acerca de cómo utilizar los diferentes cabezales con algo más de detalle. Hoy hemos publicado otro capítulo: Trazando PCBs con un Rotulador y estamos trabajando en el próximo. Este mes tenemos que terminar el tutorial porque parece la historia interminable. :-)

También hemos publicado nuevas versiones del firmware de TwinTeeth y de TwinTeethMC. Puedes encontrarlas y descargarte los ficheros en la página de instalación del software.

La nueva versión incluye soporte de archivos HP-GL, algunos cambios de menor importancia y también algunas correcciones de defectos. Todos ellos se describen en el fichero release.txt que se puede encontrar en el archivo .zip.

Además de escribir el tutorial y mejorar el software también estamos trabajando en nuevas funcionalidades.

Estamos experimentando con algo de resina UV que un amigo amablemente nos envió para que probásemos. Estamos tratando de imprimir en 3D con ella mediante el cabezal láser y de momento imprime bastante bien algunas formas básicas aunque todavía estamos buscando la mejor manera de hacerlo. Hay varias posibilidades de diseño de este cabezal. Ahora estamos trabajando sobre el contenedor de la resina y sobre cómo instalarlo en la impresora. Para la prueba preliminar hemos utilizado la bandeja que se puede ver en la siguiente imagen. La hicimos con una lata de leche en polvo para bebes :-)

También estamos probando con Scankemi. Es una película especial para hacer PCBs que no requiere de productos químicos.

Los chicos de Bifelectronic nos enviaron amablemente algunas láminas para poder probar.

Realmente todavía no sabemos cómo usarlo para hacer PCBs porque no se adhiere directamente a la placa. Por el momento lo utilizamos para probar.

Para usarlo con TwinTeeth solo tienes que pegarlo con cinta de papel sobre la plataforma de trabajo e imprimir en él con el cabezal láser. Una vez impreso hay que retirar la película superior para obtener el patrón reflexivo del lado negativo. El positivo queda en el lado superior que retiramos.

Pensamos que probablemente se tiene que utilizar como una máscara: primero imprimir el circuito en él con TwinTeeth y luego utilizarlo para imprimir las PCBs a la manera tradicional usando un insolador de UV.

Otra ventaja de Scankemi es que no necesitamos usar película Solar porque es reflexivo por naturaleza y filtra perfectamente el halo producido por el láser.

Tiene una resolución increíble. Imprimimos con mucha facilidad algunas líneas de 0,5mm de largo y 20-40μ de ancho usando el cabezal láser.

Puede verlas en la siguiente imagen ampliadas en el microscopio de 20x.

Por otro lado seguimos con la tienda vendiendo kits por todo el mundo.

Nunca pensamos que podríamos vender algo por todas partes pero está claro que la globalización está aquí para quedarse. Gracias a algunos blogs y foros Twinteeth ha tenido difusión por todo el mundo y gente de los cinco continentes nos pide información y nos compra los kits. Muchas gracias a todos ellos, sobre todo a los que compraron, porque el dinero recaudado nos ayudará a seguir investigando nuevos cabezales y nuevas funcionalidades.

Eso es todo por el momento.

Vamos a seguir trabajando, investigando y os mantendremos informados.

  • Read more about Tutorial, nueva versión del software e investigaciones
  • Log in or register to post comments

Tutorial, new version of the software and research

Submitted by DIYouware on Tue, 06/09/2015 - 20:51

We continue with the ardous task of writing the tutorial...:-)

Yeah! It's almost finished. We only need to write some chapters about how to use the various Toolheads. Today we published another one: Plotting PCBs using a marker pen and we are working on the next one. This month we have to finish it. It seems like the NeverEnding story. :-)

We also published new versions of TwinTeeth firmware and TwinTeethMC. You can find and download them at the software installation page.

The new version includes support of HP-GL files, some minor changes and also some defect corrections. All of them are described in the release file you can find in the .zip file.

Additionally to writing the tutorial and improving the software we are also working on new functionalities.

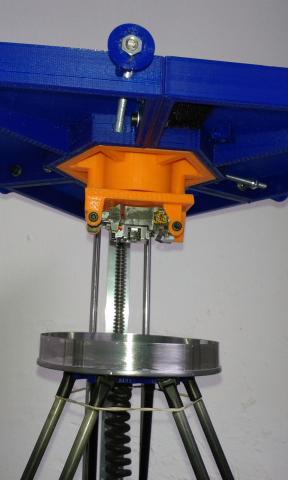
We are experimenting with some UV resin that a friend gently sent us for testing. We are trying to print in 3D on it using the laser pickup and we printed sucessfully some basic shapes although we are still looking the best way to do it. There are various designing possibilities. Now we are working on the resin vat and on how to attach it to the printer. For preliminary testing we used the tray you can see on the next picture. It is made of a tin of baby powder milk :-)
We are also testing Scankemi. It is a special film to make PCBs which does not require chemical developpers.

Bifelectronic guys gently sent us some sheets for testing purposes.

We don't really know how to use it to make PCBs yet because it doesn't adhere directly to the board. At the moment it's useful for testing.

To use with TwinTeeth you just need to paste it with paper tape on the working platform and print on it with the Laser Toolhead.Once printed remove the top film to get the reflective pattern on the negative side and the positive one on the top side.
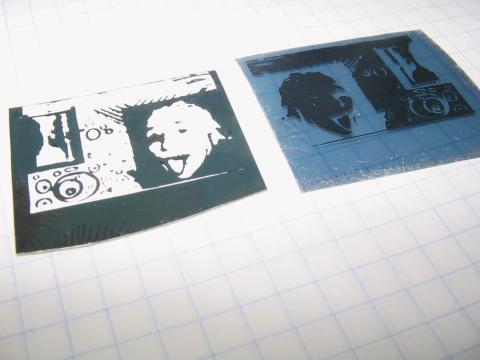
We think that it probably has to be used as a mask: first print the circuit on it using TwinTeeth and then use it to print the PCB "á la" traditional way using an UV isolator.
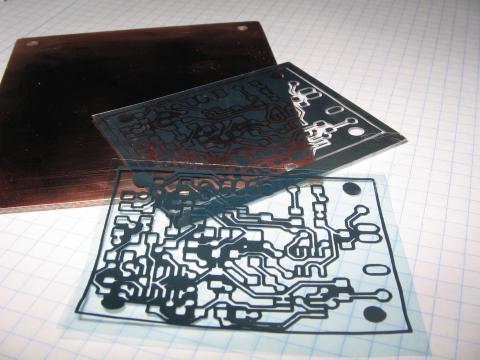
Another benefit of Scankemi is that we don't need to use Solar film because it is reflective by its own nature and it perfectly filters the "hallo" produced by the laser

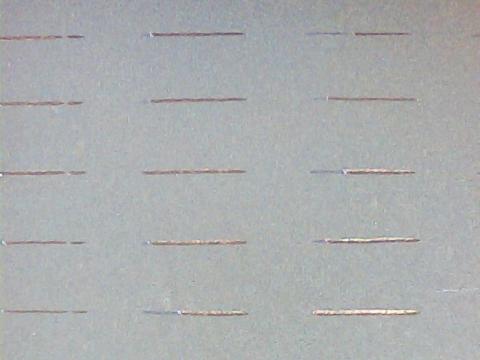
It has an incredible resolution. We easily printed some lines 0.5mm long and 20-40µ wide using the Laser ToolHead.

You can see them on the next picture at the 20x microscope.
 

On the other hand we are still managing the shop and selling kits around the world.

We never thought that we could sell them everywhere but globalization is here to stay. Thanks to some blogs and forums Twinteeth had worldwide diffusion and people from the five continents is asking us about it and the kits. Thanks very much to everyone who bought them because the money collected is helping us to continue researching ToolHeads and functionalities.

That's all for the moment.

We will continue working, researching and keeping you informed.

  • Read more about Tutorial, new version of the software and research
  • Log in or register to post comments

TwinTeeth - Trazando PCBs con un rotulador

En este capítulo veremos cómo trazar PCBs utilizando el método del rotulador permanente. Este es un método muy antiguo para pintar PCBs a mano, pero esta vez lo vamos a hacer usando TwinTeeth. El trazado de PCBs con rotulador no proporciona una resolución y precisión muy buenas pero es un método rápido para hacer circuitos simples y te ayudará a familiarizarte con el robot y aprender a manejarlo.

El proceso consiste en los siguientes pasos:

Spanish
  • Read more about TwinTeeth - Trazando PCBs con un rotulador

Pages

  • « first
  • ‹ previous
  • 1
  • 2
  • 3
  • 4
  • 5
  • 6
  • 7
  • 8
  • 9
  • …
  • next ›
  • last »

(c) 2013 Diyouware.com